github : https://github.com/orgs/benggri-public-organization/repositories
benggri-public-organization
benggri-public-organization has 2 repositories available. Follow their code on GitHub.
github.com
사용한 기술들...
Backend:
  jdk 17:
  Spring boot 3.2.0:
    security(JWT)
    jpa
    querydsl
Frontend:
  javascript
  nodejs 20
  Nextjs 14
Tool:
  VS Code
    Plugins: Dev Containers(Micorosoft)
VS Code
https://code.visualstudio.com/
마이크로소프트에서 개발한 텍스트 에디터로, 2015년 4월 29일에 소개되고 2016년 4월 15일에 1.0.0 정식판이 발표되었습니다.
Electron 프레임워크를 기반으로 만들었습니다.
일단, 기본 설치를 하면 됩니다.
특이한 설정이나 특별한 설치 방법은 없습니다.
그리고 아래 순서대로 진행을 할 것입니다.
- 1. 플러그인 설치
- 2. Docker Desktop 설치
- 3. WSL 설정(Windows만 하시면 됩니다)
- 4. ssh-agent 설정(Windows/Ubuntu만 하시면 됩니다. MacOS 는 안해도 됩니다.)
1. 플러그인 설치
VS Code 를 설치한 후 아래 스크린샷과 같이 Dev Containers 플러그인을 설치합니다

Dev Containers

원문:
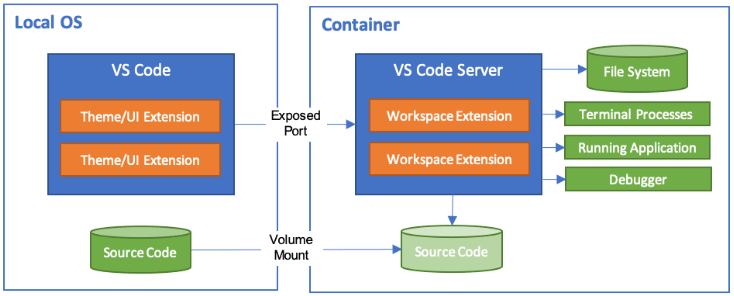
The Visual Studio Code Dev Containers extension lets you use a container as a full-featured development environment. It allows you to open any folder inside (or mounted into) a container and take advantage of Visual Studio Code's full feature set. A devcontainer.json file in your project tells VS Code how to access (or create) a development container with a well-defined tool and runtime stack. This container can be used to run an application or to separate tools, libraries, or runtimes needed for working with a codebase.
번역:
Visual Studio Code 개발 컨테이너 확장을 사용하면 컨테이너를 모든 기능을 갖춘 개발 환경으로 사용할 수 있습니다.
이를 통해 컨테이너 내부(또는 컨테이너에 탑재된) 폴더를 열고 Visual Studio Code의 전체 기능 세트를 활용할 수 있습니다.
프로젝트의 devcontainer.json 파일은 잘 정의된 도구와 런타임 스택을 사용하여 개발 컨테이너에 액세스(또는 생성)하는 방법을 VS Code에 알려줍니다.
이 컨테이너는 애플리케이션을 실행하거나 코드베이스 작업에 필요한 도구, 라이브러리 또는 런타임을 분리하는 데 사용할 수 있습니다.
https://code.visualstudio.com/docs/devcontainers/containers
... Container 설명까지 하면 머리가 너무 아프고 이 페이지가 너무 길어지게 될 것 같습니다.
간략하게 말씀드리면 프로젝트에 참여한 모든 개발자가 동일한 환경에서 개발할 수 있도록 도와주는 플러그 인 이라고 생각해주시면 됩니다.
2. Docker Desktop 설치
https://www.docker.com/products/docker-desktop/
Docker Desktop 을 기본 설치하시면 됩니다.
역시나 마찬가지로 특이한 설정이나 특별한 설치 방법은 없습니다.
3. WSL 설정(Windows만 하시면 됩니다.)
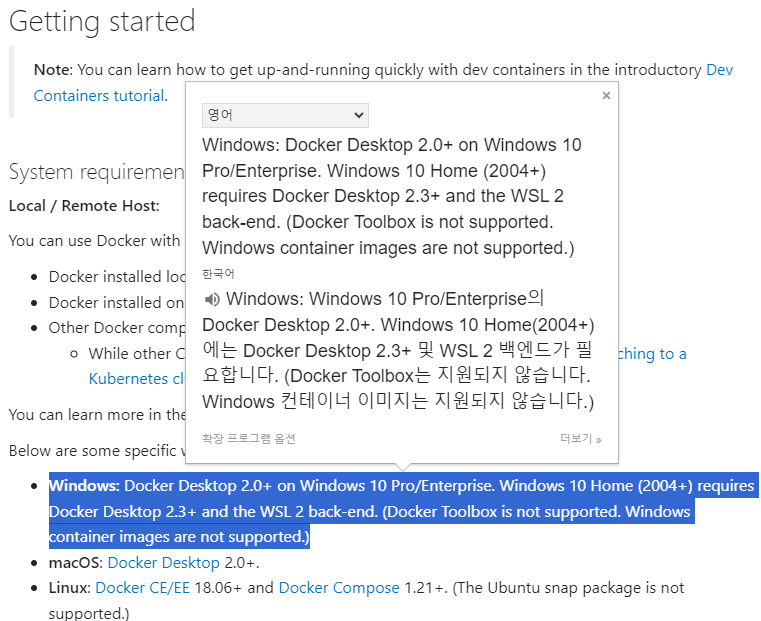
VS Code 에서 Dev Containers 에 대한 시스템 요구사항에 WSL2 가 필요하다고 되어 있습니다
(제가 한 것이 아닙니다.)

윈도우 Powershell 을 관리자 모드로 열어주세요.
wsl --install
wsl --set-default-version 2
wsl --update
이렇게 하면 끝입니다
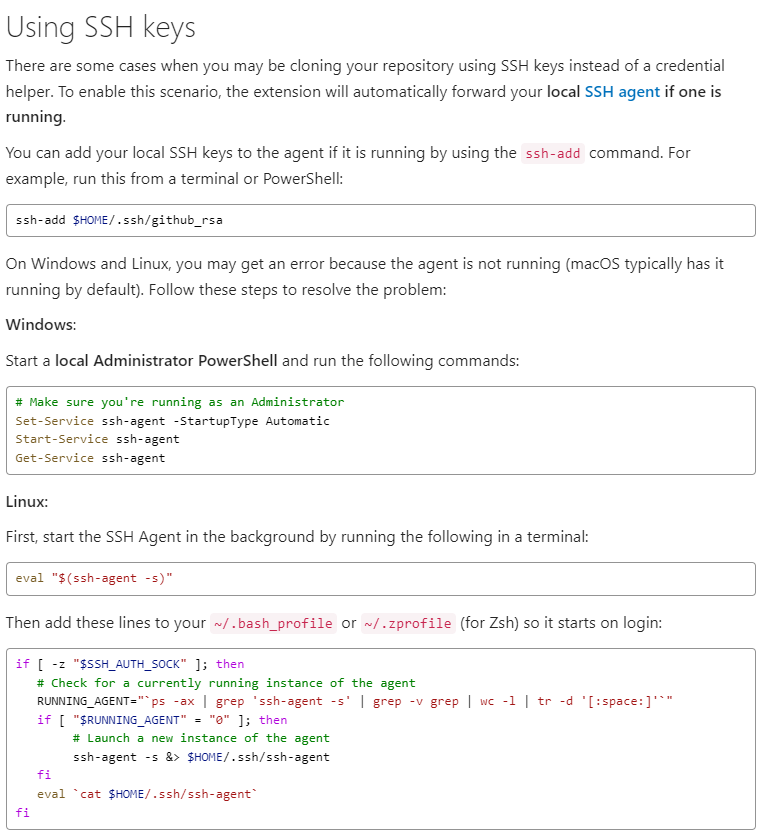
4. ssh-agent 설정(Windows/Ubuntu만 하시면 됩니다. MacOS 는 안해도 됩니다.)
github 에 ssh-key 를 등록하고 사용할 경우에 필요한 내용입니다.
https://code.visualstudio.com/remote/advancedcontainers/sharing-git-credentials

윈도우의 경우 Powershell 을 관리자 모드가 열어서 아래 명령어를 입력하세요.
# Make sure you're running as an Administrator
Set-Service ssh-agent -StartupType Automatic
Start-Service ssh-agent
Get-Service ssh-agent
Git repository
- https://github.com/benggri-public-organization/community-backend
- https://github.com/benggri-public-organization/community-frontend

git repository 는 두개를 준비하였습니다.
이름에서 알 수 있듯이 frontend 와 backend 를 분리하였습니다.
- frontend : Nextjs 로 만들었습니다
- backend: Spring boot 로 만들었습니다
계속 진행 중이라 읽으시는 시점에 따라 소스가 바뀌어있을 것 같습니다.(?)
소스를 수정하며 게시글을 업데이트 할 수 없겠다는 생각이 들어 큼지막한 내용만 설명드리겠습니다.
늘 그렇듯 샘플 프로젝트는 기본적으로 간단한 게시판입니다.
다음 단계...
- Spring Boot 프로젝트 설정 및 기능 개발
- Nextjs 프로젝트 설정 및 기능 개발
'Spring' 카테고리의 다른 글
| [Querydsl] 샘플 (0) | 2024.04.03 |
|---|---|
| Spring Boot sample project - 2. Spring Boot 설정 (0) | 2023.12.20 |
| [Spring-Boot] 기초 - 프로젝트 생성 (0) | 2022.07.28 |
| [Spring] Spring Framework MVC 커뮤니티 사이트Tutorial - 4 (0) | 2021.02.02 |
| [Spring] Spring AOP (0) | 2021.02.01 |


댓글