※ Spring Boot 가 아닌 Spring Framework MVC 프로젝트에서 MySQL 와 Mybatis 연동 설정하는 방법
1. 준비물
- Spring Framework MVC Project
2. 과정
1. Project 디렉토리 확인

※ 이전 Spring Framework MVC Project의 폴더 구조를 보면 위 그림과 같이 생성되어있습니다.
2. pom.xml 수정
※ 이전 Spring Framework MVC Project 에서 MySQL 사용을 위한 JDBC 관련 dependency 를 추가하지 않았기 때문에 추가해야 합니다.
※ 다른 설정 부분은 수정하지 마시고 pom.xml 에 아래 라인을 추가
<dependencies>
        <!-- 기타 다른 설정들... -->
        <dependency>
            <groupId>mysql</groupId>
            <artifactId>mysql-connector-java</artifactId>
            <version>8.0.11</version> <!--본인의 MySQL 버전에 맞게 쓰세요 -->
        </dependency>

        <dependency>
            <groupId>org.mybatis</groupId>
            <artifactId>mybatis</artifactId>
            <version>3.4.1</version>
        </dependency>

        <dependency>
            <groupId>org.mybatis</groupId>
            <artifactId>mybatis-spring</artifactId>
            <version>1.3.0</version>
        </dependency>

        <dependency>
            <groupId>org.springframework</groupId>
            <artifactId>spring-jdbc</artifactId>
            <version>${org.springframework-version}</version>
        </dependency>
        <!-- 기타 다른 설정들... -->
</dependencies>
3. root-context.xml 수정
※ root-context.xml 에 mybatis 와 jdbc 설정을 추가한다.
<?xml version="1.0" encoding="UTF-8"?>
<beans xmlns="http://www.springframework.org/schema/beans"
xmlns:xsi="http://www.w3.org/2001/XMLSchema-instance"
xmlns:context="http://www.springframework.org/schema/context"
xmlns:mybatis-spring="http://mybatis.org/schema/mybatis-spring"
xmlns:jdbc="http://www.springframework.org/schema/jdbc"
xsi:schemaLocation="http://www.springframework.org/schema/jdbc
http://www.springframework.org/schema/jdbc/spring-jdbc-3.1.xsd
http://mybatis.org/schema/mybatis-spring
http://mybatis.org/schema/mybatis-spring-1.2.xsd
http://www.springframework.org/schema/beans
https://www.springframework.org/schema/beans/spring-beans.xsd
http://www.springframework.org/schema/context
http://www.springframework.org/schema/context/spring-context-3.1.xsd">
<!-- Root Context: defines shared resources visible to all other web components -->
<!-- MySQL DataSource -->
<bean id="dataSource"
class="org.springframework.jdbc.datasource.DriverManagerDataSource">
<property name="driverClassName" value="com.mysql.cj.jdbc.Driver"></property>
<!--
실제 등록한 MySQL Schema 및 사용자 계정 정보를 작성한다.
<property name="url" value="jdbc:mysql://ip:port/schema?useSSL=false&serverTimezone=UTC">
<property name="username" value="test"></property>
<property name="password" value="test"></property>
-->
<property name="url" value="jdbc:mysql://127.0.0.1:3306/test?useSSL=false&serverTimezone=UTC">
</property>
<property name="username" value="test"></property>
<property name="password" value="test"></property>
</bean>
<!-- mybatis SqlSessionFactoryBean -->
<bean id="sqlSessionFactory" class="org.mybatis.spring.SqlSessionFactoryBean">
<property name="dataSource" ref="dataSource"></property>
<!-- SQL 이 작성될 Mapper xml 파일 위치를 지정 -->
<property name="mapperLocations" value="classpath:/mapper/**/*_SQL.xml"></property>
</bean>
</beans>
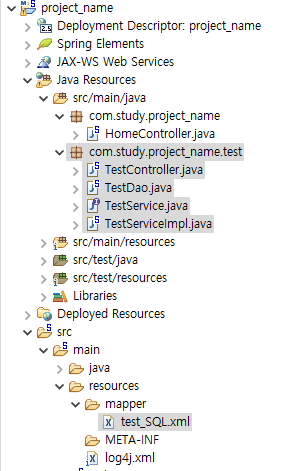
4. Controller, Service, Dao, Mapper.xml 생성
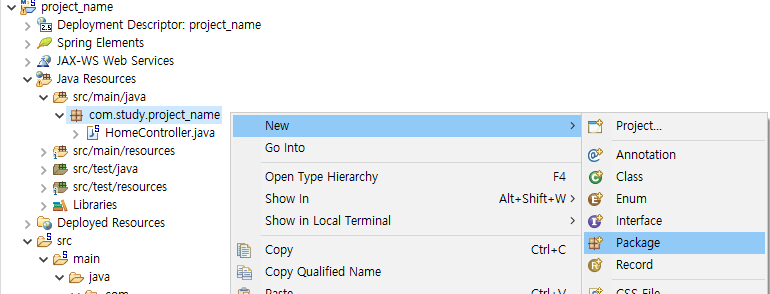
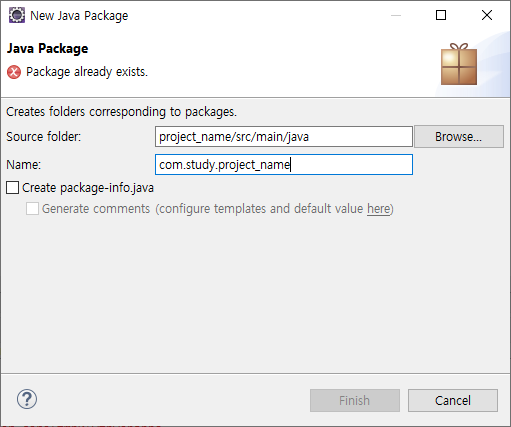
Name : com.study.project_name
이후에
.test 를 추가하고 Finish 클릭

Class 를 총 3개 만들 것이다.
TestController, TestServiceImpl, TestDao
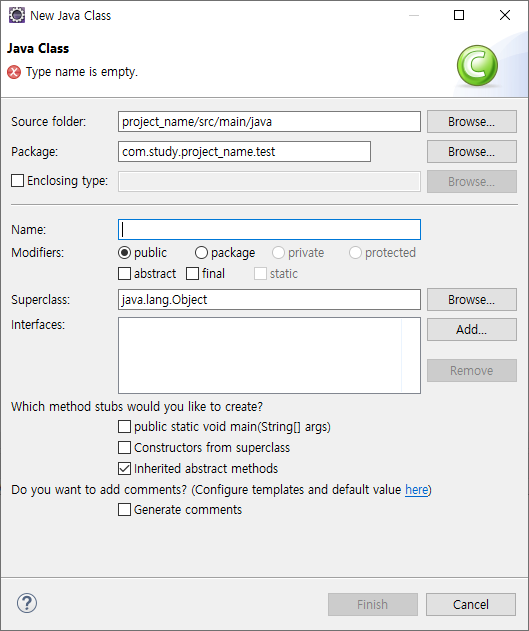

인터페이스 명 TestService 생성


mapper SQL 을 생성하기 위한 mapper 폴더 생성
모두 생성하게되면 아래 그림과 같이 생성된다.
5. 각 파일 내용 작성
※ 만약 MySQL Table 생성을 이전 포스트를 보고 하셨으면 테이블 정보를 수정해야합니다.

컬럼명이 COLUMN 일 경우 조회 쿼리가 정상 동작하지 않기 때문에 아래와 같이 수정하셔야 합니다.
기존 컬럼명 정보
PK, COLUMN

수정할 컬럼명 정보
PK1, COLUMN
1. test_SQL.xml
<?xml version="1.0" encoding="UTF-8"?>
<!DOCTYPE mapper
   PUBLIC "-//mybatis.org//DTD Mapper 3.0//EN"
   "http://mybatis.org/dtd/mybatis-3-mapper.dtd">
<!-- 이 문서가 xml 이라는 표시 -->
<!-- mapper tag 시작 -->
<!-- namespace 의 값은 TestDao 파일에서 호출하는 값과 같아야한다 -->
<mapper namespace="com.study.project_name.test.TestDao">

	<!-- select 를 실행할 select tag -->
    <select id="getList" resultType="HashMap">
        SELECT PK1, COLUMN1 FROM TEST
    </select>

</mapper>
<!-- mapper tag 종료 -->
2. Class TestDao.java
package com.study.project_name.test;

import java.util.List;
import java.util.Map;

import javax.inject.Inject;

import org.apache.ibatis.session.SqlSession;
import org.apache.ibatis.session.SqlSessionFactory;
import org.springframework.stereotype.Repository;

@Repository
public class TestDao {

    @Inject
    private SqlSessionFactory sqlSessionFactory;

    public List<Map<String, Object>> getList() throws Exception {
        SqlSession session = sqlSessionFactory.openSession();
        // mapper/test_SQL.xml 파일 mapper tag namespace 속성의 값 + select tag id 속성의 값
        return session.selectList( "com.study.project_name.test.TestDao.getList" );
    }

}
3. Interface TestService.java
package com.study.project_name.test;

import java.util.List;
import java.util.Map;

public interface TestService {

    public List<Map<String, Object>> getList() throws Exception;

}
※ Interface 에 대한 설명 별도로 작성된 문서를 확인
4. Class TestServiceImpl.java
package com.study.project_name.test;

import java.util.List;
import java.util.Map;

import org.springframework.beans.factory.annotation.Autowired;
import org.springframework.stereotype.Service;

@Service
public class TestServiceImpl implements TestService {

    @Autowired // Bean 자동 주입
    TestDao testDao;

    @Override
    public List<Map<String, Object>> getList() throws Exception {
        return testDao.getList();
    }

}
5. Class TestController.java
package com.study.project_name.test;

import java.util.List;
import java.util.Map;

import org.springframework.beans.factory.annotation.Autowired;
import org.springframework.stereotype.Controller;
import org.springframework.web.bind.annotation.RequestMapping;
import org.springframework.web.bind.annotation.RequestMethod;
import org.springframework.web.bind.annotation.ResponseBody;

@Controller
public class TestController {

    @Autowired
    TestService testService;

    @RequestMapping(value="/getList", method=RequestMethod.GET)
    @ResponseBody // 자바 객체를 HTTP 응답 본문의 객체로 변환하여 클라이언트로 전송
    public String getList() throws Exception{
        String resultStr = "";
        List<Map<String, Object>> result = testService.getList();
        for ( Map<String, Object> r : result ) {
            resultStr += r.toString();
            System.out.println( r.toString() );
        }
        return resultStr;
    }

}
6. 서버 기동
브라우저를 열고 아래 URL 을 입력한다.
- ip:port/getList
- localhost:9099/getList

정상 동작을 하였는지 확인할 수 없기 때문에 Table 에 데이터를 추가하고 다시 확인
INSERT INTO TEST( PK1, COLUMN1 )
VALUES( 1, '1' ) ;
COMMIT;
다시 브라우저로 이동해 새로고침을 한다.
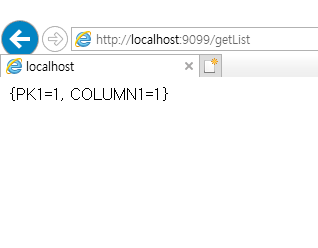
이로써 기본적인 스프링 설정은 끝이 났다.
설정 파일을 분리하여 관리하는 방법과 Logback 설정 등 추가 스프링 설정 방법을 진행할 예정이다.
'Spring' 카테고리의 다른 글
| [Spring] Annotation (0) | 2021.01.19 |
|---|---|
| [Spring] context xml 분리 (0) | 2021.01.18 |
| [Spring] web.xml 설명 (0) | 2021.01.18 |
| [Mybatis] Mybatis Procedure 호출 (0) | 2021.01.15 |
| [Spring] Spring Framework MVC 이클립스에서 기본 생성 (0) | 2021.01.13 |


댓글